A tuning job that i did recently was a S4 Nissan Patrol that had been converted with a 6LT & 6L80e, the customer had sourced his doner parts from a VF, so I kept the original factory ECU (12656930) & TCM (24267577) operating systems, but we discovered some strange shifting patterns occurring.
What i found happening is the shift speeds were not following what was set in the transmission calibration, it would instead hold out shifts well past the pedal position set point for the speed.
For example, holding the pedal at say 40% the shifts for each gear should execute 1-2 @19kph, 2-3 @ 36kph, 3-4 @ 55kph and so on, however gear shifts were holding out as if the pedal was being pushed harder, resulting in higher rpm’s before shifting.
As i had been experimenting with this same os combination in a couple of other cars and not seeing this issue occurring, i figured it was likely related to a missing brake signal. So advised customer where to wire it into the ecu & place on the light side of the pedal circuit. This way the ecu can see a gnd when not applied, then 12v when brake applied.
Upon his return, I changed the ecu tune via some custom mapped parameters to disable the analog brake select input & then confirmed that ecu/tcm both see the brake being applied, took it for a test drive & now the shifts followed at the expected pedal position.
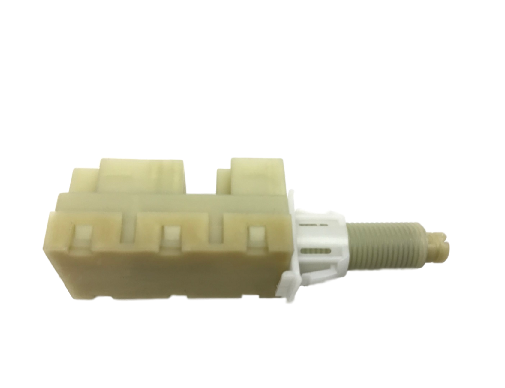
So if your wondering what this analog brake select is about, well prior to the release of the VE commodore most brake inputs were a simple on/off switch like below.
With the VE\VF it’s a position sensor, so works like most 0-5v sensors, they did a similar setup with the clutch pedal on the 06-08 manuals where it was changed from a switch to a position sensor. I also have the clutch type sensor mapped out & have utilized it on on ecu upgrades on manual cars, where the only previous option was to disable the clutch interlock for starting.
In late 2025 I saved a 6lt Crewman from a sad fate at the wreckers, it didn’t look good initially as the engine would crank but not start. Eventually when i had time to play with it, i found the fuel pump was cutting out intermittently, which I traced back to the ground wire on the fuel pump module showing signs of getting hot with burn marks, so I fitted a new pump module & replaced the plug on the harness.
Fuel pressure was now back, however the engine still wouldn’t start, So in with a set of new spark plugs and it fired to life, with the car still up on jack stands from the pump replacement (as you need to remove the rear tub to get at the bastard), it was time to test the existing gearbox which resulted in 5 neutrals…
Oh well, No big deal as the intention was to throw out the garbage 4 speed and do the 6L80 upgrade anyway & do some more testing of later year engine & transmission operating systems, specifically VF OS code.
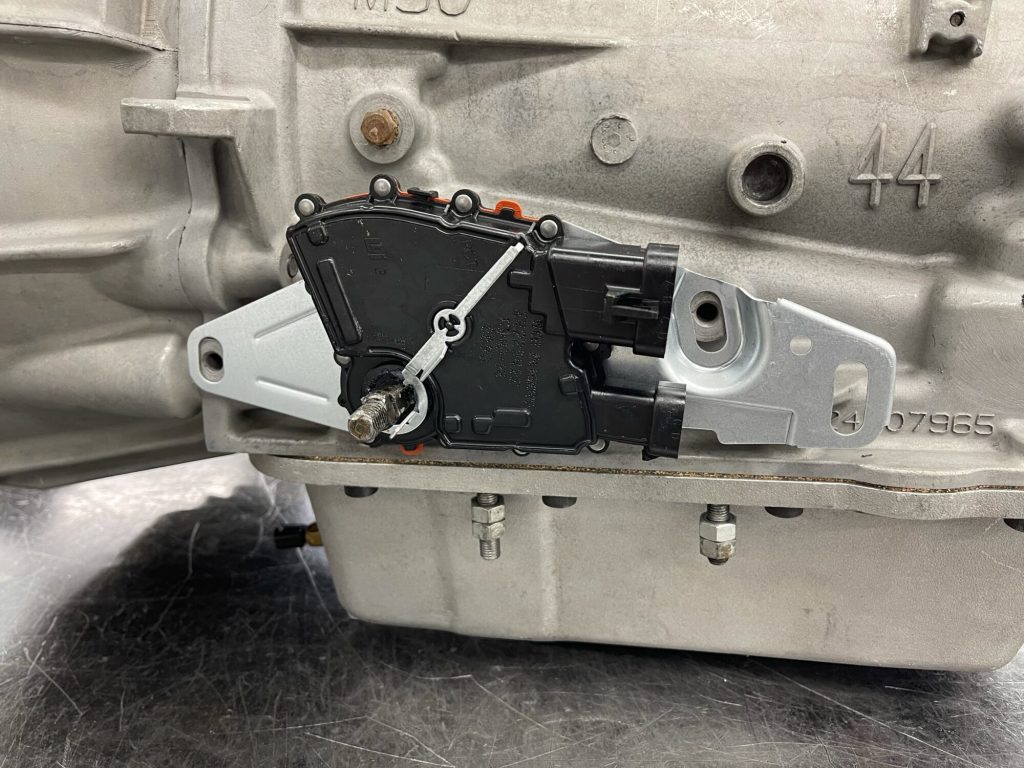
So, with the 4 speed removed & the engine taken out for a clean, it was then time to remove & replace the engine harness with a new factory looking unit which includes the 6L80 plug & associated wiring. To do this requires removal of the passenger footwell kick panel, where the factory T42 trans controller is located, along with the X211 connector which carries additional inputs/outputs from ECU to the body wiring.
For instance, the original PN signal comes via the old PN-safety switch that was fitted on the side of the 4l65, then ran into cab’s x211 connector to Pin 5, which runs under the dash to the drivers side to come out through the firewall with other inputs like throttle pedal, Transmission Output shaft speed etc to the ecu.
With the 6L80 installed & supported via the use of a new tubular transmission mount, the original 6L80 shifter rod goes straight into the factory VZ shifter, cooling is sorted via an adapter providing 2 x an6 male outlets to a couple of 90 degree push-lock fittings & hoses to a trans-cooler mounted in front of the condenser.
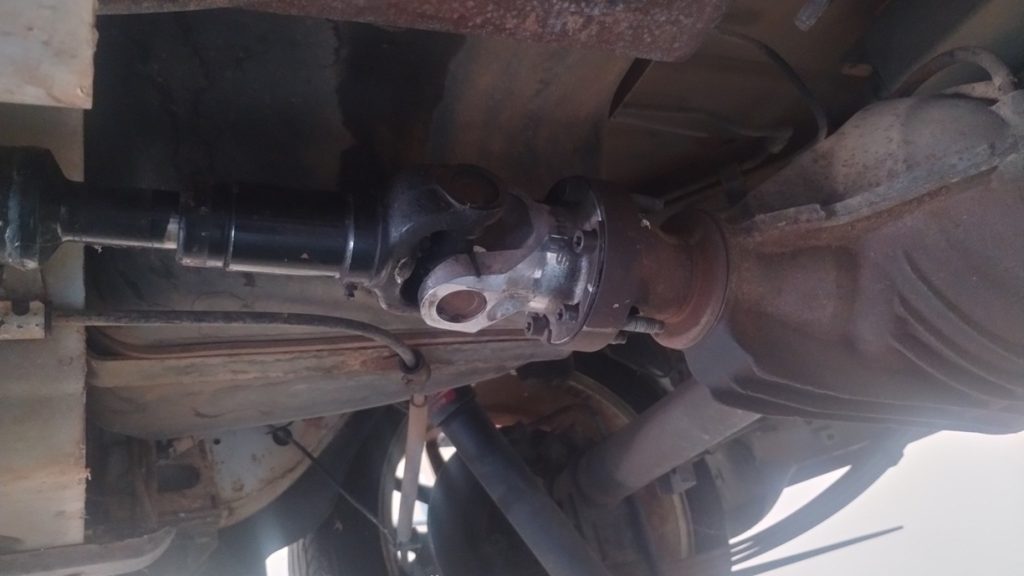
Tailshaft modification requires the front half to be lengthened along with spigot change as the 4l65 has a longer extension housing & male spigot mating. From donut face to middle of the center point bolts is 790mm on this car, the stock VE driveshaft while longer in this part, still falls short to what is required on the crewman, so required a new half shaft to be made up.
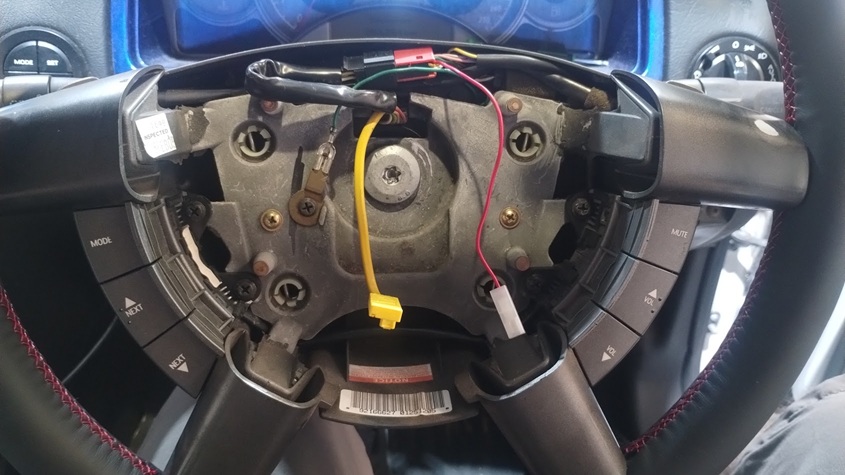
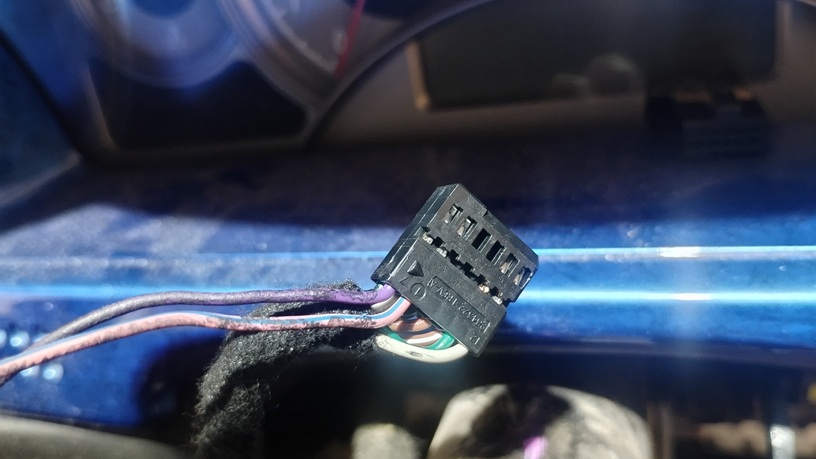
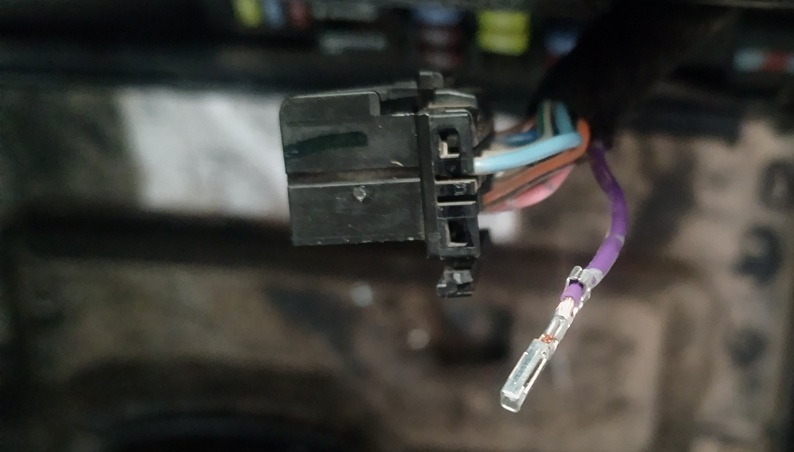
Next up is wiring for the paddle shift buttons on the steering wheel. This requires the use of a flat blade screw driver to pop the airbag off, after unplugging 2 additional plugs from the airbag, you can then remove the large nut holding the wheel in place.
With the wheel off, it’s easier to add the 2 new wires that need to be ran from the vehicle side of the clock spring under the steering column cover.
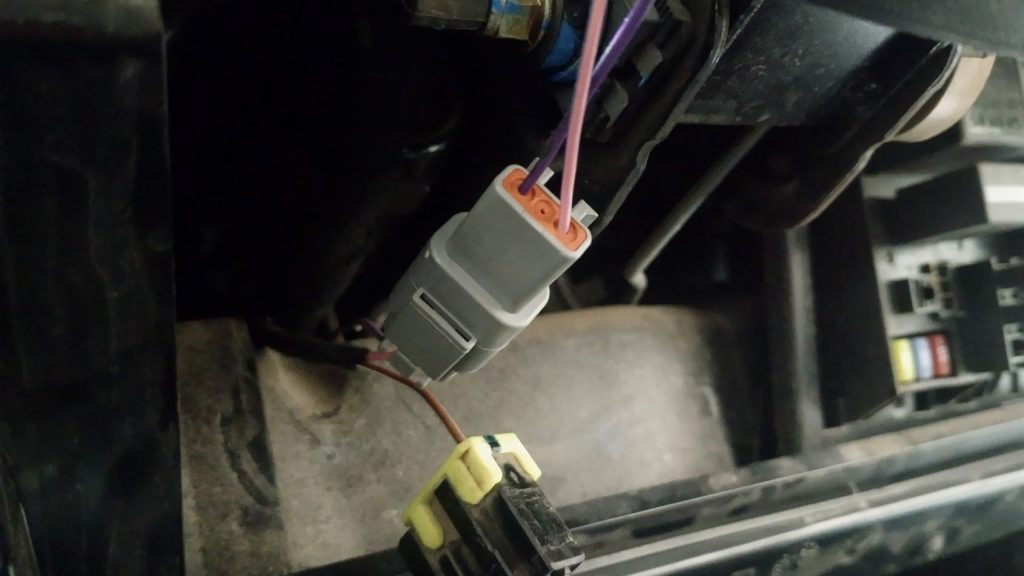
Switched 12v power to pin 8 & the tapshift signal to pin 7. In this scenario 12v is Pink\Blue coming from a unused factory plug under the steering column, Tapshift wire is Purple, both wires go to a Deutsch connector plug to aid with installation. With the cover put back on the plug, it’s re-inserted into the clock spring. While i was here i replaced the ignition switch & barrel as they were both flogged out.
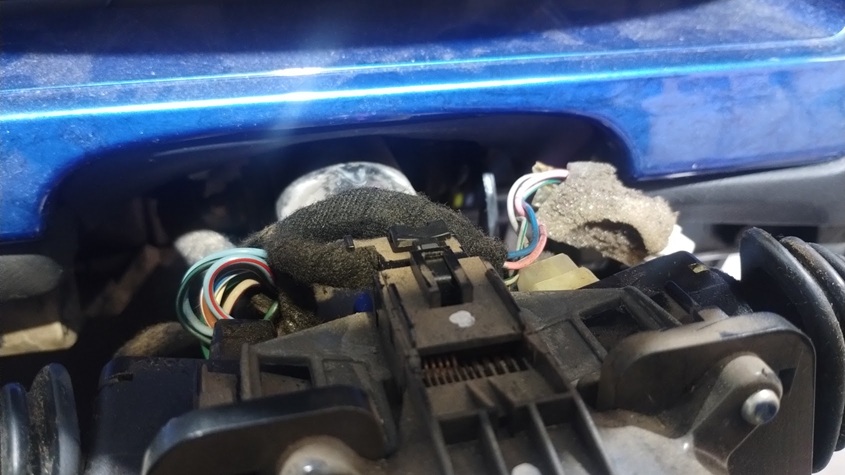
Using the deutsch connector allows for easy installation of the wiring coming from the passenger kick panel with the tapshift wiring & reverse light relay trigger.
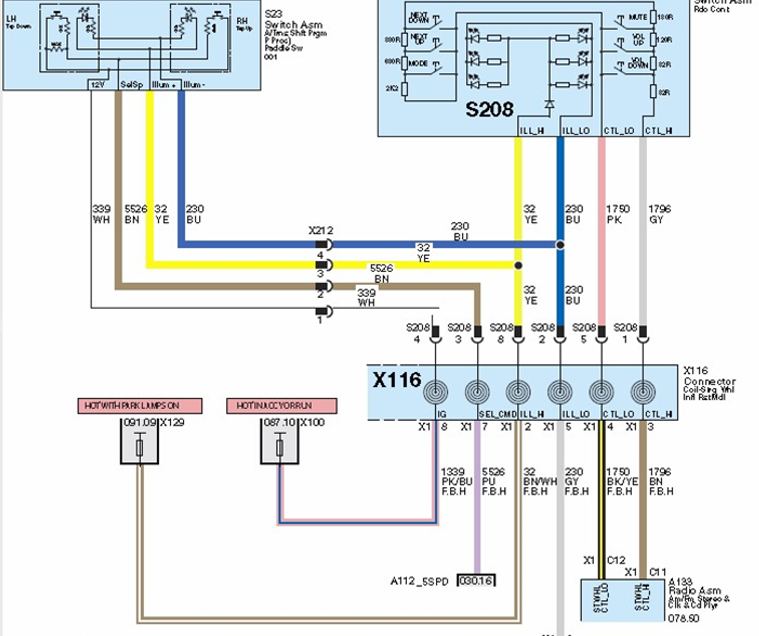
Factory wiring schematic for the steering wheel paddles
Reverse Light activation can either be done by wiring in the relay ground wire to the PIM module & then reprogramming it as a 5 speed gearbox with a Tech2. Alternatively you can wire in a micro switch inside the shifter assembly itself, that gets triggered when the shifter is moved to reverse. I’ve chosen to go the PIM route as it’s much easier for me to wire in & reprogram the PIM as a 5 speed so that it triggers the output.
An E38 ecu pin can be used for the PIM socket receptacle. Below is a picture of the factory pin type.
Over the last couple of months I’ve been helping out a fellow Holden\Pontiac owner in the USA who has been building himself a unique crewman & was starting to hit a wall getting the various factory modules working. Luckily for Josh, I’ve been playing with my own & customer converted 6L80’s vehicles for a few years and making them work where others can’t.
Josh’s VZ Crewman originally started as a RHD LS1\4L60e based car before he did the LHD conversion, full body rewire & engine harness conversion to run the LS3\6L80e, not to be done there, he then added in nanny options like Traction control & 4wheel ABS. Surprisingly the 6LT VZ Crewmans don’t get either from factory! So he did exceptionally well getting that in & working.
His 1st hurdle was he had an early 07 ECU with a late 2010+ TCM, in factory programming these are incompatible because Holden never had a factory 6L80 until VE, then there is CAN data differences between early/late year modules. While I can make them work, running a later ECU Operating System brings in added benefits with the likes of larger injector support, rev matching on downshifts improved idle control routines etc.
The later TCM also adds in additional parameters for Temporary Tapshift mode, which is a feature that we didn’t get until the VF Paddle shifter steering wheel cars were released, however all the options/parameters for these features is in the code from around 2011 onwards. None of which is currently defined in any of the common tuning suites on the market. However the factory also turned off some parameters in the later year code that was on in the early i.e the speedo output pulse.
Which comes into the next problem. While I predominantly use EFILIVE, Josh only has access to Hptuners, so a lot of the parameters I was needing to change to Josh’s tune files required me to either make changes to my own car to test & then read out with HPT. In the end, I just converted these custom options from Efilive’s CAX format into the format that would import into HpTuners & then I could make changes directly to Josh’s file.
While there is probably a good hundred hours or so going through code & testing on my own cars I have not charged Josh for any of my time, however he returned the favour by sending me some old unused ECU’s to help facilitate wasting more of my time trying to get the E40 ecu’s to work with the 6L80e.
Plus all these new parameters I have can & are already being used on local cars I work on. Anyway if you’ve read this far & not watched his video yet, give it a watch & a like.
At the end of my first post I said i would like to test using a later model ecu in place of the early units for the bigger injector data rates. Guess what.. This is that post.
Since i had already worked out how to get the 2010+ ecu to work in my VY ute with the VZ PIM, it was relatively simple to switch it over, the only concern was the use of the existing 2008/09 gearbox i had fitted to make it compatible with the early ECU code.
Luckily the 2009 TCM 24249179 calibration can be configured to work with both early & late ECU code, in fact GM did it from the factory for the 2010 Model Camaro’s, the main changes that were needed to get it to work with the early ecu/pim were kept in the TCM, with changes occurring only in the ECU.
ECU is now using OS 12639270, which was used on the 2011 Auto HSV’s & Holdens. I won’t go into too much details on all the changes but the main ones modified to match that of the pre 2011 ECU were:
Fuel Level Sensor Count & Calibration data
CAN TX & RX settings to/from GB, PIM & ABS module
IAT Sensor Data
MAP Sensor Data
Tacho Type
Starter Relay Type from 12V to GND
Engine Oil Temp to Calculated
VSS to Pulse & Data to Early CAN
Diff Gear ratio
Oil Level Switch fitted – No
Ambient Air Temp Sensor Fitted – Yes
Extended Brake Diagnostics Enabled
Regulated Voltage Control – Off
RVC- Override Disabled
Analog Brake Select – Yes
PPEI3 Select/Present – No
Speed output Type = VehRepTos
Halving the VSS pulses per rev in ecu, to double up the output pulse for the VZ speedo cluster as it was running at half the rate. The early ECU has an additional calibration value to change the output pulse.
Work in progress is trying to get the Immobilizer/VATS stuff working. Ironically this broke even when i flashed a slightly newer os calibration in the old/original ecu. so there is something different in the way the immobilizer configuration is setup.
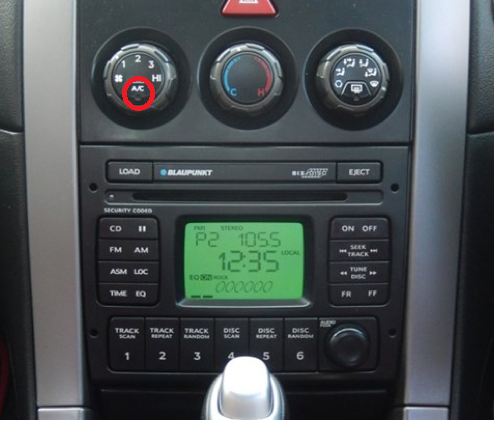
So in 1 of my vehicles, I have what is essentially a 2012 late model VE commodore E38 & 6L80 transmission in a 2002 Holden VY ute & I had 2 problems. 1- I was unable to control the AC through the factory dash button & 2 I had no automatic functioning reverse lights. For a while i got around this by having them on manual switches, but since I want everything to work as if it was factory I started looking into a solution.
Since i had been playing around with the VZ platform already & getting the 6L80 to work with the same ECM/TCM architecture, I took another look at these functions & how they were configured & thus managed to work out how to control the Aircon Compressor & Reverse lights in the later OS by manipulating the Can settings to send the correct data to the VZ PIM module.
For a bit of background info, AC Compressor Control in a factory vy ls1 is controlled by the ecu & is part of the engine harness, however the request to turn it on/off comes via a button on the climate control panel, which is wired to the BCM which talks to the original PIM via UART protocol, which gets translated to the VPW protocol to the ECU. The reason for being wired to the ECU is mostly to disengage the compressor based on AC pressure & or RPM.
On the E38 AC control is similar in that it’s wired to the ECU, but the request needs to be communicated to it via the CAN Bus, luckily Holden has already done the engineering for this in the VZ model, so it was just a matter of wiring in a VZ PIM and programming it with the right options via a Tech2, then having the ECU configured to listen & transmit the right can data.
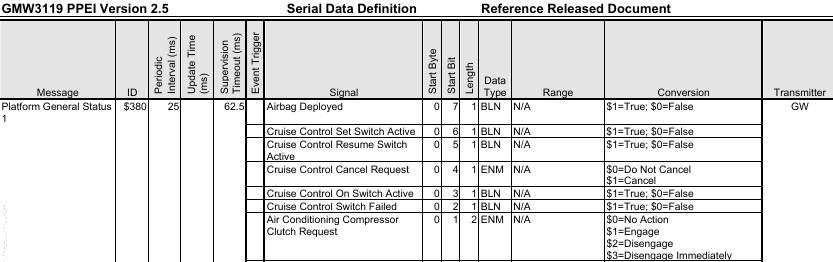
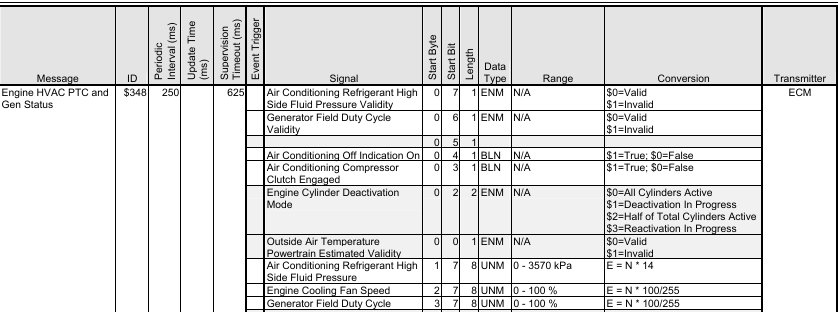
Having mapped out all the CAN ID’s for the early VZ ecu OS it was just a matter of doing a comparison against the later OS & turning the TX & RX ID’s on, in this case it was RX ID 380 & TX ID 348.
Next up was the reverse lights because unlike the 4 speed controllers which have the reverse light power wired via the Park Neutral Safety switch on the side of the box. The 6L80 is all through CAN & since the VZ PIM can be setup to ground an output when it receives the reverse signal it was just a matter of having the TCM send the correct ID – 320.
End result is the AC compressor kicks on/off when the dash button is pressed & with the help of a relay wired in & using the ground activation from the PIM I get reverse lights too.
This is a rather long post I’ve decided to put up to give an in depth knowledge dump on how the conversion was done. If you have the attention span of the average tik toker, this probably not for you.
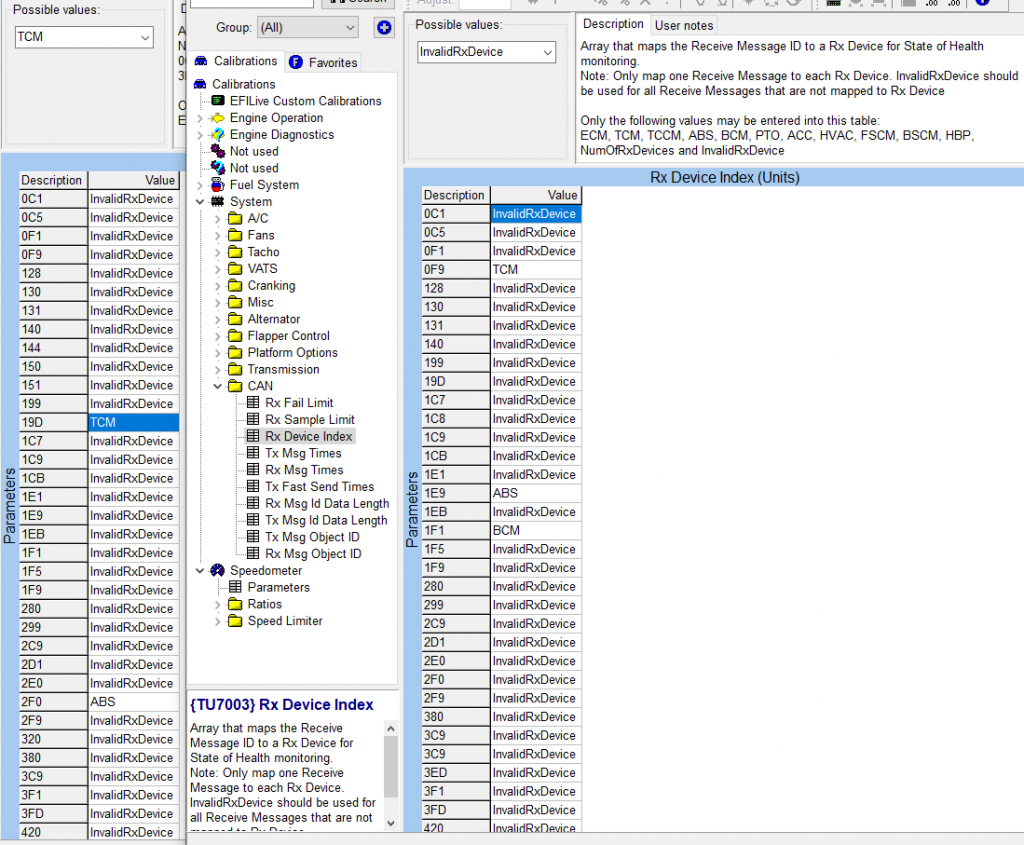
Over the last couple of years I started getting a more in depth understanding of the GM ECU & TCM code for the GM E38/T43 computers via a program called Ghidra, this is a program that can reverse engineer and decompile code from known processor architectures, not just PC’s but integrated cpu’s in automotive, home appliances etc.
It was from here I decided it was probably time i revisited trying to get an early VZ V8 to work with the 6L80 natively, I had intentions on trying to do this back in 2018, but time & knowledge was something i was very short on. Cue, many years later I now posses both knowledge, ability, time and a little disposable money to do it!
This led to me picking up slightly damaged VZ SS with the required 6lt/4L65e, Apparently it had a bit of an excursion off road when the owner fell a sleep, resulting in some damage to the front/rear bumpers and drivers side rear wheel & swing arm.
I’ve always thought it would be possible to get the 6L80 to work in the VZ 6LT cars is because it runs an E38 ecu just like the VE did when it was introduced in September 2006 with both a 6 & 4 speed auto (exported to Saudi Arabia) along with Manual options. I already knew the box physically fits in the tunnel because I have converted a few VT-VZ car’s already.
The biggest difference however is that the VZ model encompassed support for the 5.7lt LS1 with it’s P59 ecu & the Alloytec’s Bosch ecu, which meant wiring & modules to support all 3 types of engine combinations.
With a LS1 motor there is a PIM (Powertrain Interface Module) that translates data from the ecu’s native VPW protocol to UART protocol for the dash cluster, ABS & BCM modules to get data. So for the E38 ecu to talk to those same modules the PIM module now converts from CAN to UART, the ABS module went from talking on the old UART to now CAN directly, similarly things like the cruise control stalk went from the BCM to the new PIM too.
The Hard Part / Nerdy Stuff
Delving into Ghidra & selecting the relevant CPU architecture type for the ECU binary file the program can then start to decompile the file & with any luck it find’s links to instruction sets & cross-referenced values.
While Ghidra doesn’t tell you what all the numbers mean, since they can be different based on the specific use case the calibration was written for, it does help if trying to follow a structure or routine from 1 calibration to another. Similar blocks of data are often always together across different calibration/part numbers even if they located in different locations in the calibration file.
Now having the decompiled file doesn’t help on it’s own without having something to actually reference back to, so luckily some one had passed on a couple of factory style definition files that gives names & often descriptions to what each parameter is. It is with information that it becomes possible to understand what the values mean or what a simple 0 instead of a 1 means. i.e Switching something on or off.
Then it’s a matter of pattern recognition in the hopes that similar values & code structure are used across the different calibrations that GM has from all the different vehicle types. i.e Holden, GMC, Corvette, Camaro etc.
Tuning Software
From the above, it’s possible to add these “missing” options to tuning software, in my case since I primarily use EFILIVE for tuning & since they allow for users to add in options via a CAX file. The cax file basically allows the end user to add in tables or maps that are not already defined in the software.
In this case to get the 6L80 to work with the VZ ecu we need to make some changes;
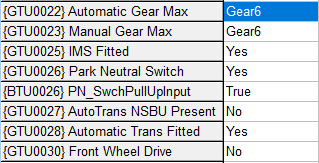
Turn off NSBU (Neutral Safety Back Up) Switch
Turn on IMS (Internal Mode Switch)
Automatic Max Gear from 4 to 6
Gearbox Gear Ratios (Optional)
Vehicle Speed Sensor Pulses per Revolution 40 to 36
Transmission Type (Optional)
1 & 2 above are a requirement because the 4L60/65 use a NSBU on the side of the gearbox, but the 6L80e doesn’t. Instead it uses an IMS inside the gearbox that slides when the shifter linkage is moved. The remaining settings feed information into things for torque mgmt & speed calibration settings.
While i didn’t bother to test not changing the above settings with the 6l80 wired in, it made no sense not to since when looking at a factory 6L80 ecu tune the new values are what are configured, it would appear even the early Holden calibrations didn’t have the correct gear ratios & transmission type selected on the 2006-2008 VE models.
Wiring
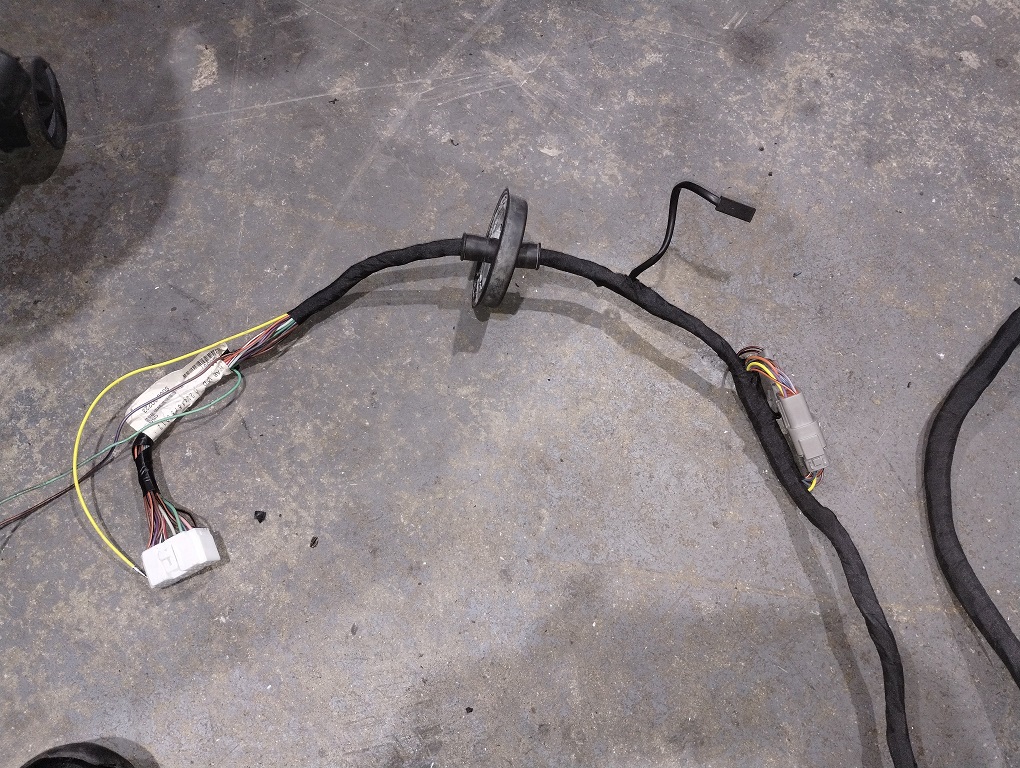
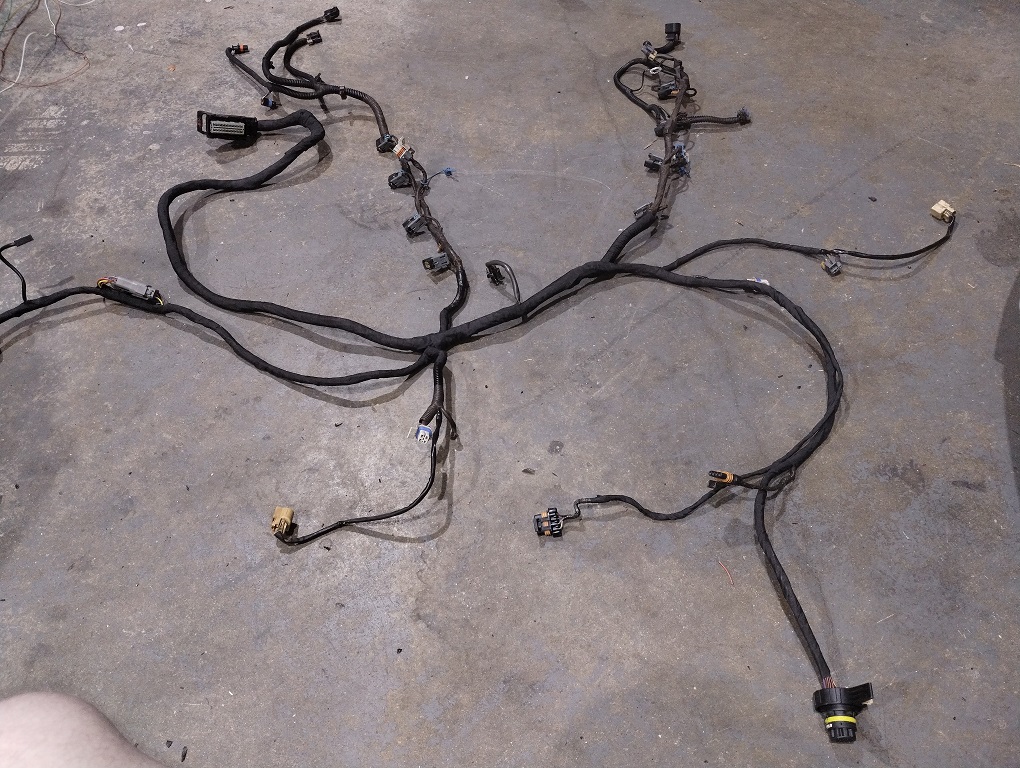
For the wiring, I pulled the engine harness off the motor & stripped out all the old NSBU & trans plug wiring along with the wiring to the original T42 trans controller that sits in the passenger kick panel. A majority of the wiring to the T42 controller is repurposed, In this instance I simply terminated the wiring to a new deutsch connector that sat on the engine bay side of the firewall. This then allowed for me to make changes if needed during testing.
New transmission plug & wiring re-wrapped in new automotive high temp tape.
6L80 Install
Installing the box is simple, just unbolt the old 4 speed and install the new 6 speed with matching torque convertor, original shifter rod will require some slight adjustment so that it doesn’t rub along the side of the case. A new trans mount & modified tailshaft then needs to be done as the 6l80 uses a larger 3 bolt spigot.
CAN BUS – Make it, break it or fake it?
Now with that done, the ECU side should be happy right? Sort of, it’s really going to depend on what your donor transmission came from. At the time of starting this conversion project I was under the impression of 1 simple fact when it came to the TCM’s that are in these gearbox’s.
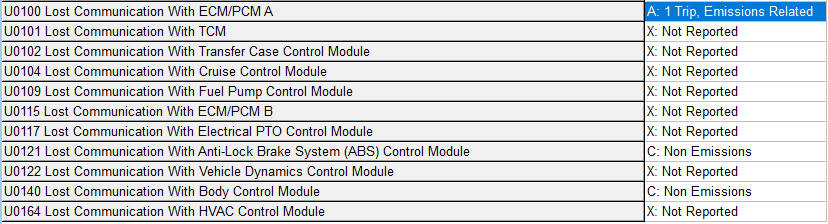
There was 2 year ranges that were programmatically compatible with each other, that being years 2007 to 2009 & then from 2010 to 2017 i.e end of the VF’s. This meant that you could not install a 2010 gearbox into a 2007 model car & have it work, It would come up with a U0100 or P0700 DTC, Hell even a 2009 gearbox tune will not talk which always bothered me because it didn’t make sense that by simply performing a full OS flash with an 07 or 08 tune into the 09 techm it would work.
The solution to this problem it seems was always in the code. In every ECM & TCM operating system is the CAN ID broadcast data, now this does vary from 1 OS to the next, but luckily the majority of CAN ID’s needed for the ECM/TCM modules to talk/listen to each other have not changed too much over the years.
So what I found was the CAN ID’s that the ECM\TCM were configured to use for it’s “State of Health Monitoring” between the modules was different. SOHM basically runs as a check to confirm that the other module hasn’t disappeared, If it looses communication it triggers a check engine light & potentially limp mode.
So with this knowledge I started with a 2008 TCM OS as my baseline to confirm communication to ECU, gearbox would shift etc, then changed over to a 2009 OS.
With changes to the 09 Calibration to match similar settings to that of the earlier 08, I was no longer getting a U0100 code or 3rd gear limp mode. Great news! Now I wonder how far can i can push this?
Slight side track…
So I grab an older 06 ecu from my collection & install it in my vy ute, This effectively runs a 2011 VE ECU & TCM OS combination since it’s a 6lt/6l80 combo. I change out the ecu & flash the VZ tune file in with some basic injector & map settings to get it running, multiple flashes later & that too now communicated to the ECU with no error codes. I could shift into 3rd gear via tapshift and reverse in & out of my workshop. When i got the settings wrong, I would momentarily have reverse and 1st gear before it would lose forward gears.
I’ll be doing some further testing in 06 VE soon by replacing the ecu with a later year thanks to it’s larger injector support to see if i can get it to work & be happy with all the other CAN modules.
For those interested to know how E85 goes on a high comp NA LS motor, have a read.
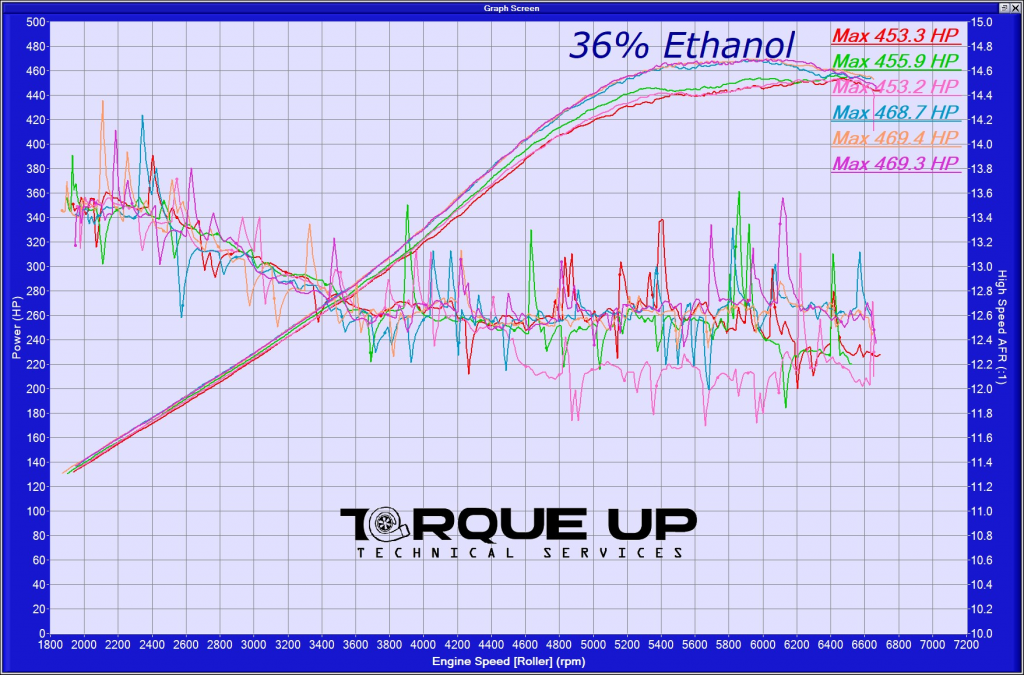
After upgrading my Corvette ECU (2009 to a 2012) & putting in some LSA injectors & a flex fuel sensor, I figured I should run it on the dyno to check power, air-fuel ratio, since I just used GM injector data from a factory LSA car & then used the short term fuel trims to get it in range while cruising around on the street.
Anyway, ye old stock LS7 with it’s 11:1 compression, has a rather aggressive factory timing map & uses other tables to pull timing for air & coolant temps. however it still ends up using the knock sensors to pull additional timing.
Since I don’t like the idea of the motor rattling, then pulling timing, my timing map starts with a good 3-5 degrees less @ WOT where it matters with the slightest bit of knock being detected (mainly to see if adding E85 would remove it) Result = 453-455whp (17 degrees & 5400rpm) on Pump 98 Octane.
I then loaded in 22lts of E85 into the tank, ran car until ethanol content stayed consistent at 36%. Ran same timing as pump & seen a 10hp increase up top where it was previously registering knock – 464whp.
Next I added 2 degrees across entire map, now making 469whp, but picking up more power from 3600-6200rpm. Still registered slight amount of knock above 6200 nothing concerning but mentioning it as timing is still only 20 degrees at this point.
Putting in additional degree of timing made no more power as it detected more knock & thus pulled it back out again.
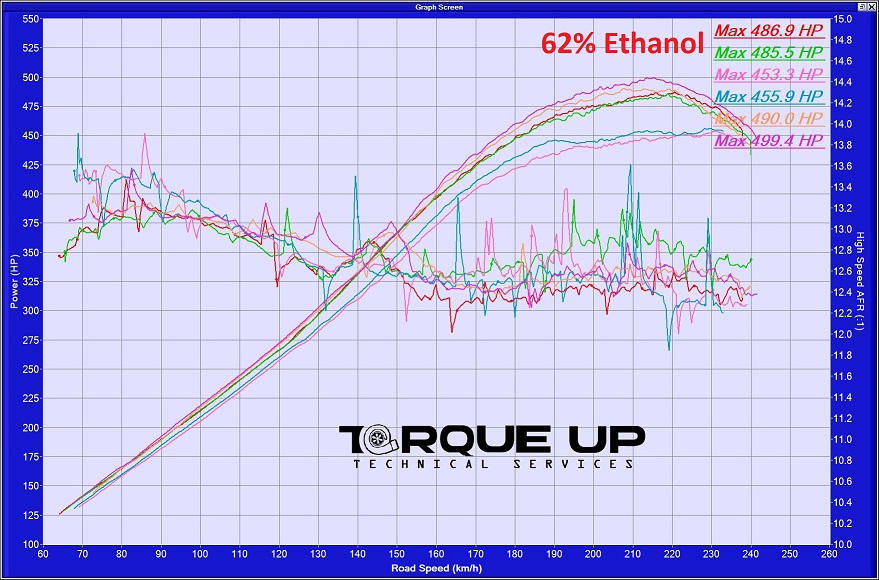
62% Ethanol Update
Timing wise, the engine took 1 more degree of timing then the 36% from the other day, so played with the fuel. The 490 & 499hp runs were done at a faster ramp rate (Shoot8F). Total gain from Pump98 ~ 30WHP.
Haltech Sport ECU & Wideband, AEM High Pressure pump installed replacing Kalmaker tuned ecu & hobbs switch controlled window washer style water/meth injection pump. Original ECU Tune & Water/meth setup made 296 & 293whp. Excessively rich midrange mixture which often caused hesitance to rev out. Large gains picked up via timing/fuel changes with Haltech ecu across the board by being able to trigger the water/meth spray only when needed.
Something I’ve played with for a few years, specifically in the late VZ/VE E38/E67 ecu’s is the ability to edit the Pedal to Throttle mapping correlation.
With the arrival of drive by wire, the accelerator pedal was now physically disconnected from the throttle body, so it was now possible for vehicle manufactures to alter the response & power of the vehicle independent of the drivers “demand” (foot), Which is why DBW cars originally copped a bad wrap because people noticed the lack/loss of “feel” from the pedal in regards to throttle response.
So, why did manufactures go to it? With the integration of more safety orientated or performance enhancements like ABS, traction & launch control it was now possible to alter the pedal response to either restrict throttle opening or give more for the same pedal movement, you can start to understand why they did it.
Also when you think about it at the most basic of levels and like everything in life it always comes down to the Dollars, specifically WARRANTIES. If you can reduce the potential for abuse on the drive line, you stand to save a fortune as a manufacturer on potential faults/repairs.
Anyway, on to the cool stuff. What I’m about to show is a couple of examples of power limiting rather then power adding. The reason for this “limiting” is because the setups are both Supercharged V8’s, so there is sometimes a need to limit the amount of boost the blower creates, i.e over-driven blower.
Vehicle 1
The first car was a VE E3 Clubsport with a stock LS3 Auto, bar a cat-back exhaust with over 140k km’s on it at the time the Harrop FDFI2300 supercharger went on, with further mods to happen at a later stage, I wanted to allow the owner to get used to the power (his dad & my preference). So no valve spring or fuel system upgrades as yet.
After the blower first went on I started by doing some small load testing at various rpm’s to see what the maximum boost was, I expected it would be well over 10psi since the blower originally came off my own Cam’d 6lt ve ute making that.
Since it still had stock headers & cats it made north of that at around 12.5 even with a larger blower pulley fitted to reduce the boost, which is why I moved on to do some testing with restricting the throttle opening. This is done pretty easily in Efilive by adjusting the pedal to throttle mapping.
Factory Pedal Calibration
What you can see above is the factory calibration & how below the 2500rpm row, the values are lower, I can only assume to smooth any large pedal movements at low rpm. The numbers themselves do not correlate to a 1:1 rate to the throttle blade opening.
In the next 2 pictures you can see that at 2600rpm the Accelerator Pedal is at 100% however the Throttle blade opening is only at 69%. This is achieved by modifying the throttle response map.
As expected with the 6 rib drive setup on this car, as the rpm’s started to climb the boost started to drop off. Luckily because the blower was capable of generating more boost then needed, I could tailor the boost curve how i wanted by simply manipulating the throttle mapping, which is why from 4500rpm I start to allow more throttle opening to maintain boost pressure.
High RPM Throttle Opening
The end result was a 130whp gain for on a complete stock LS3 motor/exhaust combo.
Vehicle 2
The second car is my own VE Ute which got upgraded to the Harrop FDFI2650 with the LSA drive belt setup, this is a more aggressive combination setup with full exhaust, flex-fuel & bigger motor with a Fore Innovations Twin 450 pump setup. All though it does have an aftermarket converter & trans cooler it still has a stock 6l80e.
It had previously ran 10.5 over the 1/4 with a touch over 600whp on pump fuel in 2015, for now I’ve just been filling it up with E85 because it’s not driven on a daily basis.
Since the ute has the same Operating system as the Clubsport it had the same base throttle map configuration. So below power runs were done after severely restricted throttle opening until 6500rpm to get a baseline.
Initial Pedal Map Testing
Further playing in the Pedal response map I eventually got to my desired boost to pedal correlation. While also limiting the response at lower throttle movements to make the car easier to drive, since with the larger 102mm throttle it can be very touchy for traction if your not careful.
Modified Pedal Mapping
Throttle limiting in action APP = Accelerator Pedal vs ETCTP = Throttle Opening %
Power Run log
Couple more tweaks to Pedal Map with the end result being a nice linear power graph
So those that know me, know I’m a big fan of the 6L80/90e transmissions, especially since the 4l60e is plain garbage when it comes to taking any power & so something I’ve been working on for the last few months & during the “COVID 19” lock down is installing the 6 Speed Auto (6L80E) gearbox’s from the VE commodore into the early VT-VZ chassis for a couple of mates.
Having already converted my own VY ute to VZ/VE ecu/transmission last year I knew they physically fit in the tunnel just fine & perform exceptionally well.
However the TCM (brains of the gearbox) expects to receive & send data to the ecu for it to work. Luckily a company in the US who does a lot of OEM integration work have a controller which allows you to run the gearbox with ANY engine combo, including Carb or Diesel motor’s (providing you feed it an rpm & tps or pedal signal) as it act’s as a “middle man” to transmit the required information to the transmission.
PCS Controller – TCM-2650 & Wiring Harness
Imagine that! a gearbox that when tuned correctly will take 500whp+ with ease & still have 2 over-drives & can be picked up for as little as $250 (probably start increasing now..) Wreckers, your welcome :-p
Anyway, the first car to receive a gearbox upgrade was a VZ Clubsport that was originally manual, however had been converted to a th400 for drag/roll racing due to being turbo’d, but due to the 3.46 diff the car was no longer enjoyable to drive on the freeway or long trips due to high cruising rpm’s.
Installation is straight forward, requiring a custom steel bracket cutout to suit the original gearbox rubber mounts, new 8.8 bolts/washer & hybrid VE/VX tailshaft.
Custom Transmission Bracket
For the Tail shaft the front half requires a slip yoke just like the VE/VF since the gearbox & diff side are fixed points.
Final Drive Engineering built the tail shafts
Being a VZ, it was really easy to integrate tap-shift buttons on the steering wheel as there is already a factory steering wheel option with them (VZ SV6), so with the simple addition of 2 additional wires into the clock spring harness below the steering wheel & plugging into the relevant 12v and signal wire to the TCM they worked straight away (besides programming changes in the gearbox).
VZ Steering Wheel with Tap Shift
So now you can drive the car in “D” mode for full auto or pull back to “3” and have manual shift control all the while doing a tad under 2000rpm @ 100kph in 6th gear.
For now this car is running a factory 2010 (0CPA) gearbox & converter for it’s new engine run in & tuning, but will eventually get a new All Fast converter to help spool up.
The second car to get an upgrade was a friends Auto VX SS with just an exhaust & OTR with 180k km’s in change & already running a 3.46 diff ratio.
Now your probably thinking why spend so much on a car you can pick up for $2000? (Pre Covid Tax)
Well this car is a Dad & Son venture to go drag racing again & knowing that the 4L60 is the weakest link for durability & it would cost similar money to make strong enough to be reliable, I raised the question of why not go with the 6L instead, with the bonus of having better gear ratios & thus not requiring a further diff ratio change.
GM Gear Box Ratio’s
To start with they decided to go with a Yank 4000 rpm converter straight off the bat, knowing that they would eventually be doing a head/cam upgrade in the future.
This car is setup similar to the VZ in regards to tap shift mode, however for the moment manual gear selection is done via a small switch until a VZ steering wheel can be acquired & installed. Stock Shifters are still in use for both cars, so there is no visual difference between inside the car.
Power wise the stock LS1 motor is making a consistent 312whp for now & using a 2008 year (8CVA) gearbox, while the VZ is making a tad under 600whp on low boost & pump fuel.
Safety & Tuning Options
Just like factory, the cars will not start unless in Park or Neutral, this is done via the programming of PWM output’s on the PCS Controller. VZ requires 12v to start, LS1 is a Ground, A relay is required for reverse lights however.
PCS Configured PWM Output’s
To get as much longevity out of the gearbox (especially on high hp combo’s) it’s a good idea to do some form of torque management for shifts, on the VZ this is accomplished via a relay to “switch” the inlet air temp to a configured temperature to an area of the tune it would never normally get to & this is setup to pull a bunch of timing (which can be varied based on rpm), which is what the PWM9 above is configured for, initially set to 1 second for testing it has since been adjusted, remember it still takes time for the physical relay to turn on/off.
Spark Cut for shifts
The LS1 ecu however can have the Operating system code changed out to Efilive’s Custom OS 5 which has Boost & Nitrous support, so when an input is triggered it can retard timing at different rpm levels, though the same method deployed in the VZ is a universal solution.
LS1 Timing Retard vs RPM
Tuning of the gearbox is done just like normal via either Efilive or Hp Tuners for adjusting shift speeds/pressures etc, However the PCS controller does come into play as it can adjust the reported “engine torque output” sent to the transmission, for a normal sub 400whp engine combo the standard calibration is perfectly fine to use. Just ensure the TPS & engine calibration is correct.
There are 2 different versions of software for the adjusting the PCS controller & while the later version is the best to use to make changes, it’s seriously lacking in functionality with the live monitoring component broken.
Luckily the older software version will pull a smaller calibration area out & allow adjustment of pretty much all the same things & has a functioning monitor so you can calibrate/confirm your TPS settings & check inputs are working.
PCS Monitor Mode
Word of warning: There a lot of options in the software & most will have no effect on the 6L80 as it’s a “universal” controller for multiple transmissions, so don’t go uploading firmware that is not intended to run a 6l80e, also some of the available outputs like PWM 2&3 are what are configured to send the TPS & Torque information, so don’t re-define for other outputs.
I also found that the wire used as the speedo out, does not work with GM computers & needs to be moved to pin 17 on the controller labelled as the Zero Crossing Point. I Set the PPM to 2000 or 4000 & then adjusted the ecu settings as needed to get ecu & dash clusters lining up correctly. A Tech2 may be required to adjust cluster PPK values.
Ideally you need the use of a dyno so you can confirm the speed the transmission is reporting based on your tyre/diff ratio as it uses this to perform the shifts, the speed is then sent to the PCS controller over can-bus which then relays that out the speedo wire.
Cost wise:
PCS Controller/Harness = $900 usd Tailshaft = $5-600 if providing both halves (original rear, with ve front) Gearbox = Whatever you can low ball for a decent working one *Converter optional* Trans Cooler Adapter = $45 from memory Trans Cooler & lines = $300? sky’s the limit, depends if you already have one or starting from scratch
Labour/Time to work out the wiring & programming shit? = Priceless (I probably spent a good week breaking/working things out)
The VX was done in 2 days, 1 day to swap trans, run lines for trans cooler.
2nd day to do wiring & work out speedo settings, this excludes driving/testing shift and converter lock up speeds etc.
Performance?
Well the VZ is always fighting for traction until 5th gear with it’s RE03’s & the VX goes surprisingly well for it’s power output & the current 17″ cheap street tyres.
Shift testing
That’s it for now, I hope this post inspires you to get rid of your “4L shitty” or worse gearbox.